How to use a Canon camera imaging station
Overview
This page contains information for first-time digitizers who would like to photograph specimen sheets using a Photo-eBox inside the Herbarium Digital Imaging Center. Below are step-by-step instructions for getting started and selecting new-user preferences specific to software installed at a Canon camera imaging workstation. Detailed equipment specifications can be found on on the XXX page.
Getting started
Turn on Photo-eBox
- Power on the Photo-eBox by pressing the green power switch only. If there is no green switch, flip the switch on the far right side of the front panel.
- Please, do not touch the other switches or knobs.
- Allow the lights to warm up for ±3 minutes before you begin photographing specimens.

Turn on Computer
- Log in using your NYBG user name and password. If you do not have an NYBG user account, please log in as a visitor (visitor/Visi3tor).
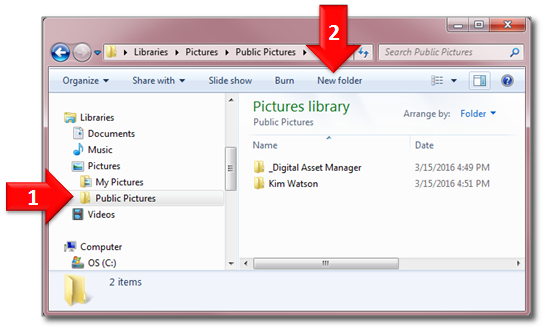
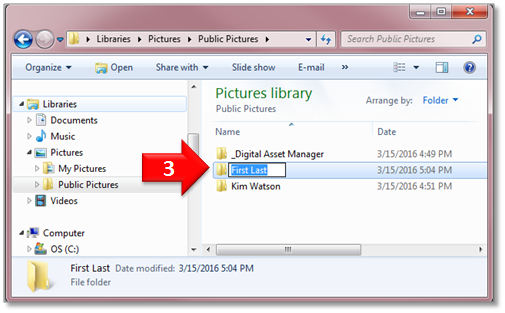
- If you do not already have a folder in the Public Pictures directory on the computer hard drive, please create one as follows:
- Using Windows Explorer, navigate to C:\Users\Public\Pictures
- Within "Public Pictures" create a new folder
- Rename the new folder with the digitizer's First then Last name
 :
:


Using a Canon Camera Station
Start camera and software
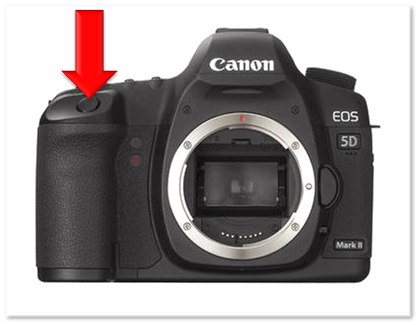
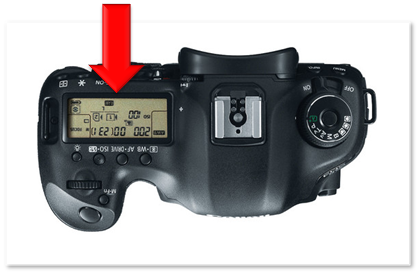
Wake up the Canon camera by gently pressing the shutter button half-way down. The camera is continuously powered on but hibernates when inactive. Numbers on the LCD screen as shown below indicate the camera is active.
- Please do not swich "OFF" the camera at the end of your session.
- Please avoid touching the camera when possible, to prevent bumping it out of focus for you or the next user.
 ::
::


Any imaging workstation equipped with a Canon camera will have two software applications installed and ready for use on the computer's desktop:
- EOS Utility is used for remote camera control and shooting from the computer. First-time users must first select certain "preferences" before s/he may begin digitizing specimens.
- Digital Photo Professional is used to view raw image files captured with the Canon camera.
EOS Utility should open automatically when the camera is activated. If it does not, open the software from the computer desktop. A window like the one below will open. Select "Camera settings/Remote shooting."

Select "Preferences"
The "Camera Settings and Remote Shooting" control panel allows the user to change camera settings and press the shutter release button from the computer.
- Select "Preferences..."
- Do not change any camera settings without the assistance of the Digital Asset Manager. They have been pre-selected according to the lighting conditions specific to each workstation.

Basic Settings
- Select "Show [Camera settings/Remote shooting] screen".
- Select "Start EOS Utility automatically when the camera is connected"

Destination Folder
- Select Browse.
- Navigate to and select your folder in the "Public Pictures" folder: C:\Users\Public\Pictures
- Select "OK"

If preferred, one can select the box for "Download Images". When selected, the software will automatically create and save images to a new subfolder according to the date the images are captured.

File Name
- Select "Customize"
- Enter the following:
- Line 1: Type FirstLastName followed by "_"
- Line 2: Select <Shooting Date>
- Line 3: Type "_"
- Line 4: Select <Image Number>
- Select "OK"

After creating the customized file name, confirm that this option has been selected from the drop-down list. You should see an example image file name starting with your name.

Download Images
Default setting is correct. "Images not yet downloaded"

Remote Shooting
Select box for "Rotate image".

Linked Software
Default setting is correct. Software to link is "Digital Photo Professional".

Time settings
- Select "Always match the computer time"
- Select "OK" to save all selected preferences

Image Capture
Take your first picture
Once all preferences have been selected, you are ready to take your first picture.
- Press the spacebar or the shutter release button on the EOS Utility interface to take a picture.
- Digital Photo Professional will open automatically. Navigate to your folder to view your images.

Rotate images
Images for first-time users will be oriented horizontally or in landscape view. All images must be oriented vertically or in portrait view prior to post-processing.
- Change the orientation of future images by pressing the "rotate" button
 on the EOS Utility interface 3 times (or 1 time for every turn 90° clockwise).
 - Take another picture to confirm new images will be captured vertically or in portrait view. EOS Utility will save and retain this orientation for returning users.

Delete images
Delete any images you do not want to submit for post-processing.
- Select the image(s). Selected images will have an orange border and/or be shaded a darker gray than the others.
- Press the "Delete" key, or right-mouse-click and select "Delete".
- Select "Yes" when asked, "Are you sure you want to move file to the Recycle Bin?"

Check Focus and Exposure
Check the first image for good focus
- Double-click on any thumbnail to view the image at 50% magnification. Double-click again anywhere on the image to view that area at 100% magnification.
- View the heading of the collection label at 100% magnification to check focus. If image is out of focus, contact Kim Watson.

Check the first image for proper exposure
- View the color target at 100% magnfication to check exposure.
- Move the cursor over the white square on the color target. The RGB values will be displayed under the image, usually in the lower left corner of the window.
- The RGB values should be >215 and <235. Contact Kim Watson, if they are not.

Check every ±20 images for focus and exposure
- After checking focus and exposure with the first image, please confirm with every ±20 images that the focus and exposure have not changed.
- The number of images captured is indicated at bottom of the Digital Photo Professional window.

Specimen Imaging Standards
Please see the page Specimen Imaging Standards for detailed instructions.
Finishing an imaging session
- Close all software programs, including EOS Utility and Digital Photo Professional.
- Empty the desktop recycle bin.
- Turn off the Photo-eBox using the green (or master) power switch only.
- If no one is scheduled to use the station after you, please shut down the computer.
- Do NOT switch "OFF" the camera. It will hibernate when inactive.
- Clean or brush out the inside of the Photo-ebox and around the station, so it is ready for the next user.
- Return all items to wherever they belong (e.g. forceps, weights, "Imaged" stamp, etc.).
- If you are the last person to leave the Imaging Lab, please turn off all the lights.