How to use a Nikon camera imaging station
Overview
This page contains information for first-time digitizers who would like to photograph specimen sheets using a Photo-eBox inside the Herbarium Digital Imaging Center. Below are step-by-step instructions for getting started and selecting new-user preferences specific to software installed at a Nikon camera imaging workstation. Detailed equipment specifications can be found on on the XXX page.
Getting started
Turn on Photo-eBox
- Power on the Photo-eBox by pressing the green power switch only. If there is no green switch, flip the switch on the far right side of the front panel.
- Please, do not touch the other switches or knobs.
- Allow the lights to warm up for ±3 minutes before you begin photographing specimens.

Turn on Computer
- Log in using your NYBG user name and password. If you do not have an NYBG user account, please log in as a visitor (visitor/Visi3tor).
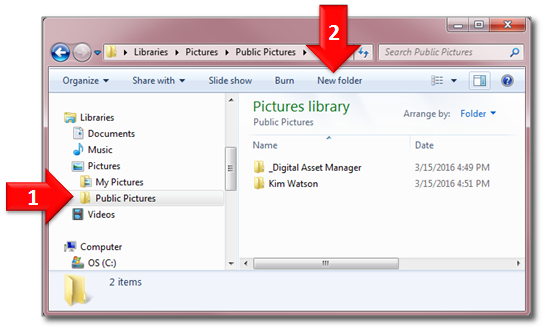
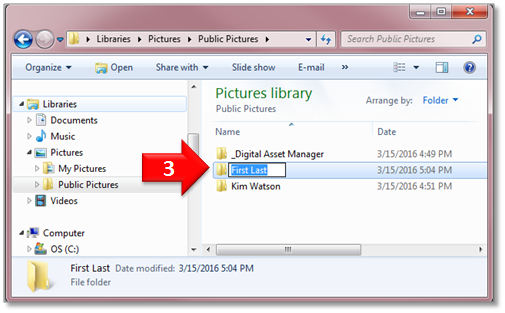
- If you do not already have a folder in the Public Pictures directory on the computer hard drive, please create one as follows:
- Using Windows Explorer, navigate to C:\Users\Public\Pictures
- Within "Public Pictures" create a new folder
- Rename the new folder with the digitizer's First then Last name
 :
:


Using a Nikon Camera Station
Start camera and software
Turn on the Nikon camera by gently toggling the power switch to the "ON" position. The Nikon camera does not hibernate when inactive, so it is necessary to switch it "ON" and "OFF" at the start and end of any imaging session.

Any imaging workstation equipped with a Nikon camera will have two software applications installed and ready for use on the computer's desktop:
- Camera Control Pro 2 is used for remote camera control and shooting from the computer. First-time users must first select certain "preferences" before they may begin digitizing specimens.
- ViewNX is used to view raw image files captured with the Nikon camera.
Remote Shooting Settings
The Camera Control Pro software allows the user to change camera settings and press the shutter release button from the computer.
Select Options
- Select "Options" located under the "Tools" tab.
- Do not change any camera settings without the assistance of the Digital Asset Manager. They have been pre-selected according to the lighting conditions specific to each workstation.

- Select the checkbox marked "Shoot". Choose "Space" from the drop-down menu. Deselect boxes next to "Ctrl", "Shift", "Alt". Deselect "AF and Shoot".
- Select "Synchronize camera date and time with computer when camera is connected"
- Select "OK"

Select Transfer Options
Select "Transfer Options" located under the "Tools" menu.

Destination Folder
Set the destination folder for your images, this is where your images will be saved.
- Select Browse.
- Navigate to and select your folder in the "Public Pictures" folder: C:\Users\Public\Pictures
- Select "OK"

File Naming
- Select Edit.
- In the "Prefix" field type your name followed by an underscore and your project acronym. In this example the project is "Newly Mounted" and the acronym is "NMTD". If you do not know your project acronym contact your supervisor or the Digital Asset Manager.
- Select "Shooting date and time" in the drop-down menu.
- Select "OK"

Complete Transfer Options
- Select "Attach IPTC Information"
- Select "Embed ICC Profile"
- Select "OK"

Rotate Images
When the program is opened images will be oriented horizontally or in landscape view. All images must be oriented vertically or in portrait view prior to post-processing. At Nikon stations images must be rotated at the beginning of each imaging session.
Change the orientation of images by selecting "Rotate Images by 90 Degrees CCW" located under the "Image" menu.
