How to Install EMu: Difference between revisions
Jump to navigation
Jump to search
No edit summary |
No edit summary |
||
| Line 1: | Line 1: | ||
<span style="color:#FF0000;">'''Before you begin installing Emu 4. | <span style="color:#FF0000;">'''Before you begin installing Emu 4.3, make sure you uninstall any existing version of EMu from your computer:'''</span> | ||
• Go to Control Panel->Add or Remove Programs and select “KE EMu (NYBG)” from the list. | • Go to Control Panel->Add or Remove Programs and select “KE EMu (NYBG)” from the list. | ||
= Install EMu 4. | = Install EMu 4.3 = | ||
• Go to: X:\Pub\EMU_Install_files\Current EMu install file\emu-nybg-4- | • Go to: X:\Pub\EMU_Install_files\Current EMu install file\emu-nybg-4-3-1412241.exe | ||
• Double click on emu-nybg-4- | • Double click on emu-nybg-4-3-1412241.exe to start the installation. | ||
• Click Next until you get to the “Select Components” screen. | • Click Next until you get to the “Select Components” screen. | ||
| Line 29: | Line 29: | ||
'''<big>Windows XP users:</big>''' | '''<big>Windows XP users:</big>''' | ||
*Select the X drive from the drop down at the bottom of the dialog box. | |||
*Navigate to the emunybg43 folder and highlight it to look like this image '''(Please note: the image says emunybg41 but you need to choose emunybg43)''' | |||
*Select the X drive from the drop down at the bottom of the | |||
*Navigate to the | |||
:[[File:ClipCapIt-141114-092256.PNG|File:ClipCapIt-141114-092256.PNG]] | :[[File:ClipCapIt-141114-092256.PNG|File:ClipCapIt-141114-092256.PNG]] | ||
| Line 44: | Line 40: | ||
:[[File:ClipCapIt-141114-092506.PNG|File:ClipCapIt-141114-092506.PNG]] | :[[File:ClipCapIt-141114-092506.PNG|File:ClipCapIt-141114-092506.PNG]] | ||
*Type or Copy/Paste<span style="color:#FF0000;">\\emc_ext\science\Pub\ | *Type or Copy/Paste <span style="color:#FF0000;">\\emc_ext\science\Pub\emunybg43</span> into the top field then press the “OK” button: | ||
:[[File:ClipCapIt- | :[[File:ClipCapIt-150310-152009.PNG|File:ClipCapIt-150310-152009.PNG]] | ||
| <br/> | ||
*Press the “Next” button on the remaining screens and then “Finish”. | *Press the “Next” button on the remaining screens and then “Finish”. | ||
| Line 55: | Line 51: | ||
*Use bluegum as the Host and 20085 as the Service. | *Use bluegum as the Host and 20085 as the Service. | ||
:[[File:ClipCapIt-150310-152116.PNG|File:ClipCapIt-150310-152116.PNG]] | |||
| | ||
Revision as of 19:22, 10 March 2015
Before you begin installing Emu 4.3, make sure you uninstall any existing version of EMu from your computer:
• Go to Control Panel->Add or Remove Programs and select “KE EMu (NYBG)” from the list.
Install EMu 4.3
• Go to: X:\Pub\EMU_Install_files\Current EMu install file\emu-nybg-4-3-1412241.exe
• Double click on emu-nybg-4-3-1412241.exe to start the installation.
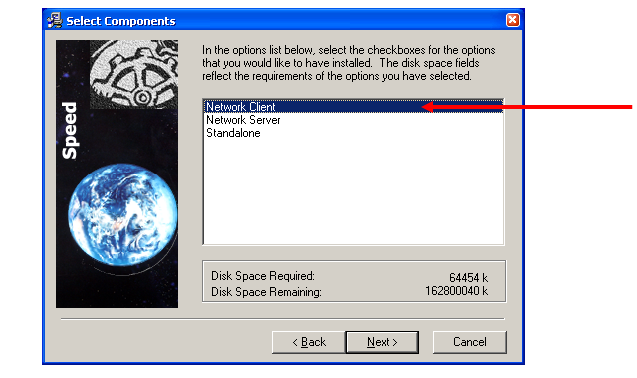
• Click Next until you get to the “Select Components” screen.
• Choose “Network Client”
- Click the “Next” button to continue
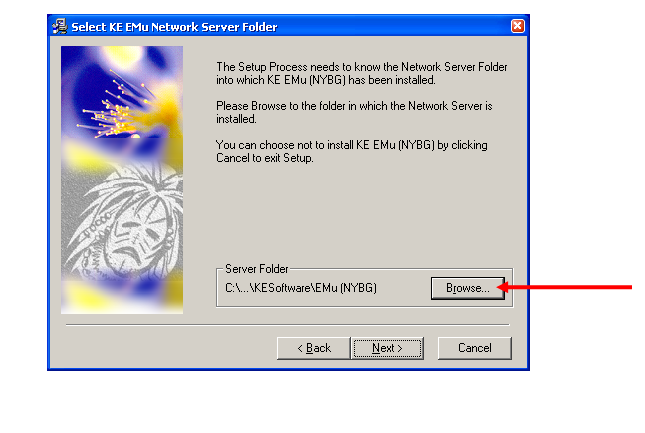
- At the “Select KE EMu Network Server Folder”, click the “Browse” button:
The next step depends on which operating system you have on your computer:
Windows XP users:
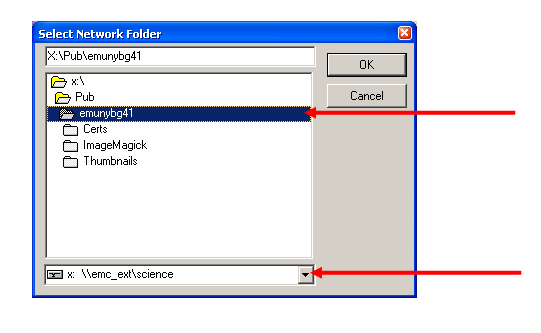
- Select the X drive from the drop down at the bottom of the dialog box.
- Navigate to the emunybg43 folder and highlight it to look like this image (Please note: the image says emunybg41 but you need to choose emunybg43)
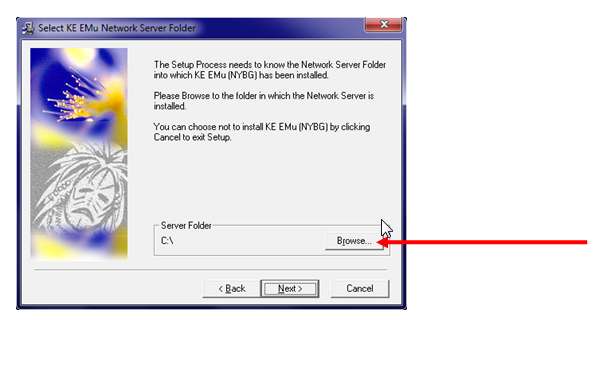
Windows 7 users:
- Click the “Browse” button:
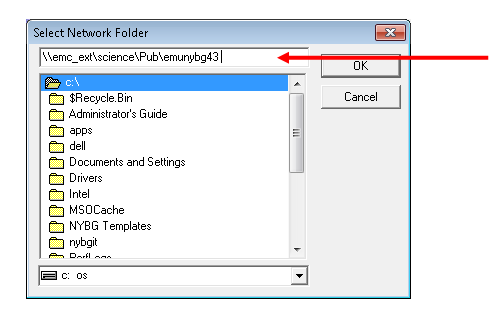
- Type or Copy/Paste \\emc_ext\science\Pub\emunybg43 into the top field then press the “OK” button:
- Press the “Next” button on the remaining screens and then “Finish”.
Log in:
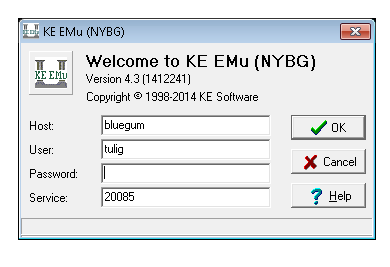
- Use bluegum as the Host and 20085 as the Service.
